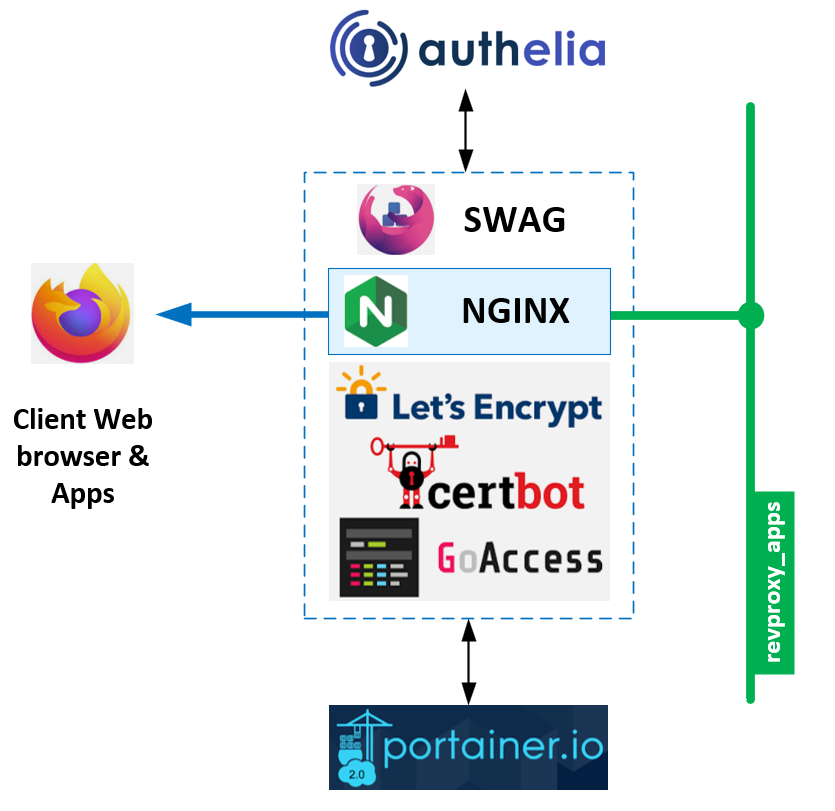
An opinionated Secure Web Application Gateway (SWAG) & Authelia HTTPS reverse application proxy for your dockerized software stacks! This stack implements the following building blocks :
- Secure Web Application Gateway (SWAG) for Nginx best practice gateway + certbot + fail2ban + goaccess
- Authelia with built-in elegant 2FA for secure access to your apps
- Portainer CE for daily docker monitoring
- Homepage for your deployments... well... Homepage :-)
Please 1st ensure that you deployed a fresh docker + compose environment on your server. If not, please follow the docker installation guide and the docker-compose installation guide. Dont forget to follow the post-installation steps to ensure your docker environment is properly configured.
- Install utility tools:
# yum install git nano make htop wget tshark nano tree - Carefully create / choose an appropriate directory to group your stacks GIT reposities (e.g.
~/AppContainers/) - GIT clone this repository
git clone https://github.com/elasticlabs/https-nginx-proxy-docker-compose.git
To successfully implement this solution, you'll need to ensure that the following DNS records are existing and properly pointing towards your server's IP address (replace example.com with your own domain name). Ensure those properly resolve from your server using nslookupcommands
| Tool | Record | description |
|---|---|---|
| Homepage | example.com |
Your server homepage URL. Portainer will be accessed through example.com/portainer URL |
| Authelia | auth.example.com |
Your Authelia URL. Authelia API will be accessed through auth.example.com/api URL |
| SWAG Dashboard | dash.example.com |
Your SWAG Dashboard (GoAccess) URL |
This stack is composed of 4 main services : SWAG, Authelia, Portainer and Homepage. Therefore, preparing the deployment has to follow a progressive order to complete successfully.
| Tool | Steps |
|---|---|
| Docker Compose | * Rename .env-changeme file into .env to ensure docker compose sets its environement correctly.* Modify the following variables in .env file :* VIRTUAL_HOST= : replace example.com with your homepage domain name (usually ROOT domain).* CERTBOT_EMAIL= : used for let'sencrypt account.* SUBDOMAINS=auth,dash.* AUTHELIA_SUBDOMAIN=auth.example.com.* TZ=Europe/Paris by your timezone. |
| SWAG | * Rename .env_swag-variables-changeme file into .env_swag-variables to ensure docker compose sets its environement correctly.* Modify the following variables in .env_swag-variables file :* TZ=Europe/Paris by your timezone.* MAXMINDDB_LICENSE_KEY= : replace <license-key> with your Maxmind licence key personal licence key.* DOCKER_MODS= : uncomment this line to use SWAG Dashboard + Maxmind GeoIP2 database. |
| Authelia | * move data/authelia/config/configuration.yml.changeme to data/authelia/config/configuration.yml.changeme Apart from the AUTHELIA_SUBDOMAIN variable in the .env file, it's not recommanded to setup and run Authelia immediately at this step. Please make the whole stack work before enabling security. When ready, please navigate to Authelia |
| Homepage | No need to change anything in the configuration of Homepage for now, the makefile gets you covered! |
| ▲ Top |
|---|
A lot of work has been done to make the deployment of this stack as easy as possible. The following section describes how to deploy the stack and how to use it. It is based on the Makefile and following operators :
- Get help :
make make up: brings up the whole stack.upalways triggers amake buildbefore, so you don't have to worry about it.make build: (Optional) checks that everythings's OK then builds the stack images.make hard-cleanup: /!\ Remove images, containers, networks, volumes & data
If all runs well, you should check for services status, especially SWAG with the following command : docker compose logs swag-proxy. Especially, negociating the certificates creation with Let's Encrypt can take a while. Please be patient. Once SWAG becomes ready, you should see something like this :
elabs-secure-proxy_swag-entrypoint | Server ready
Additionnal commands are available to help you manage your stack :
make update: (Optional) updates the stack images.docker compose logs <service-id>: shows the logs of a specific service (double-tab to list available services)docker compose exec <service-id> /bin/bash: opens a shell inside a specific service containerdocker compose ps: shows the status of the whole stackdocker compose ps <service-id>: shows the status of a specific service
| ▲ Top |
|---|
The following section describes what your get after a successful automated depoyment and how you can refine or complement the default configuratino to better fit your needs, create accounts, and secure the whole deployment.
After deployment you have 5 minutes to setup an administrative user accomunt in the Portain GUI.
- If you fail to do it and access portainer, you'll be redirected to a
timeout.htmlpage. - When this happen, simply restart Portainer :
docker compose restart portainer, then create this 1st account. The tool is ready. - Authelia : Once ready to secure your server, please go to the Authelia section to learn more.
This secure gateway comes with a simple and fancy pre-configured server homepage.
I chose Homepage over others for its simplicity and its ability to be easily customized. It is static, and meant to be fully customizable to tailor your needs.
Configuration
Homepage is configured through a couple of YAML files:
bookmarks.yml: place here a list of your favorite websites, like in your web browser, but specialized for your deploymentservices.yml: where you can manually or automatically add your dockerized servicessettings.yml: to customize its behaviourwidgets.yml: where you can add fancy and useful widgets to your homepage. Please go there to learn more!- Authelia : Once ready to secure your server, please go to the Authelia section to learn more.
Big idea short : when thinking about deplying a new stack, you have 2 major choices to make :
- Either you want your stuff to live in a subfolder (e.g.
https://example.com/your-app/) - Or you want your stuff to live in a subdomain of your domain (e.g.
https://your-app.example.com/)
Subfolder
SWAG comes with many sample configuration files matching most common COTS on the market. You can find them in the /config/nginx/proxy-confs/ folder. Please visit the SWAG reverse proxy documentation to learn more.
These configuration files follow a simple naming convention : <app-name>.subfolder.conf.sample.
During startup, SWAG will automatically load all the <app-name>.subfolder.conf files and aggregate their location blocks to the default.conflive nginx file.
- Therefore, in this case you only act on the
locationblocks.
To operate, you need to :
- Move the sample file to a new file without the
.sampleextension (e.g.cp nextcloud.subfolder.conf.sample nextcloud.subfolder.conf)- You can also move the file to the
./data/swag/config/nginx/proxy-confs/build folder to keep things clean and tidy (the gitignore file doesn't track the*.samplefiles). - Edit the new file to match your needs (e.g.
nano nextcloud.subfolder.conf) - Authelia : if you want to secure access to this new app, please go to the Authelia section to learn more.
- You can also move the file to the
- Restart SWAG to take the new configuration into account (e.g.
docker compose restart swag)
Subdomain
In that case, you need to create full server blocks for a given subdomain.
Again, you can find sample config files in the /config/nginx/proxy-confs/ swag-proxy container folder. Please visit the SWAG reverse proxy documentation to learn more.
To operate, you need to :
- Copy the sample file to a new file without the
.sampleextension (e.g.cp nextcloud.subdomain.conf.sample nextcloud.subdomain.conf)- You can also move the file to the
./data/swag/config/nginx/site-confs/build folder to keep things clean and tidy (the gitignore file doesn't track the*.samplefiles). - Edit the new file to match your needs (e.g.
nano nextcloud.subdomain.conf) - Authelia : if you want to secure access to this new app, please go to the Authelia section to learn more.
- You can also move the file to the
Dashboard
This opinionated SWAG deployment comes with a pre-configured dashboard. It is based on the SWAG Dashboard and Maxmind GeoIP2 database docker mods.
To operate, you need to :
- (skip if already done during the preparation steps) In the
.env_swag-variablesfile :
- Uncomment the
DOCKER_MODSvariable - Replace
<licence-key>with your Maxmind licence key personal licence key
-
Add the following line to
/config/nginx/nginx.confunder thehttpsection:include /config/nginx/maxmind.conf;
-
Move
/config/nginx/maxmind.conf.sampleto/config/nginx/maxmind.confand edit it to add countries to the blocklist / whitelist according to the comments, for example:map $geoip2_data_country_iso_code $geo-whitelist { default no; GB yes; } map $geoip2_data_country_iso_code $geo-blacklist { default yes; US no; }
-
Use the definitions in the following way for any application you may restrict to specific GeoIP2 countries:
 server {
     listen 443 ssl;
     listen [::]:443 ssl;

     server_name some-app.*;
     include /config/nginx/ssl.conf;
     client_max_body_size 0;

     if ($lan-ip = yes) { set $geo-whitelist yes; }
     if ($geo-whitelist = no) { return 404; }

     location / {
-
(Re)start SWAG to take the new configuration into account (e.g.
docker compose restart swag-proxy) -
Access the dashboard through
https://dash.example.com/URL
| ▲ Top |
|---|
During the stack preparation steps, the following files should be initialized with the authelia domain name :
.env:AUTHELIA_SUBDOMAINvariable sets the Authelia domain name./data/authelia/configuration.yml.changeme: lots of variables matching Authelia and other tools domain names should be initialized./data/swag/config/nginx/snippets/authelia-authrequest.conf: theerror_pagevariable should be initialized with the Authelia domain name./data/swag/config/nginx/proxy-confs/*.confand./data/swag/config/nginx/site-confs/*.conf: Authelia related lines are commented out. Uncomment them to enable Authelia authentication for a given app, in the following steps.
Initial configuration
First of all, move the ./data/authelia/configuration.yml.changeme file to ./data/authelia/configuration.yml to enable your own custom authelia configuration. The .gitignore file is set to ignore production related files. In this section, we'll focus on setting the 2FA authentication to work on its own before enabling it for the whole stack.
The ./data/authelia/configuration.yml configuration file is provided as a working kickstarter. Please modify the following sections :
| Topic | Section | description |
|---|---|---|
| Keys | * jwt_secret.* Session secret. * Storage encryption_key |
Please modify some symbols and generate new hardened keys to strenghen your stack security |
| 2FA with Duo API | duo_api |
Please follow the Duo API Authelia docs to create your own API credentials and fill that block, then uncomment |
| SMTP | smtp |
Please follow the SMTP Authelia docs to create your own SMTP credentials and fill that block, then uncomment |
Testing
Once Authelia configuration is ready, you can start the service with docker compose up -d --build authelia. You can then check if the service is running using the following command : docker compose logs authelia. If everything is OK, you should see something like this :
elabs-secure-proxy_authelia  | time="2023-06-22T20:15:36Z" level=info msg="Authelia v4.37.5 is starting"
elabs-secure-proxy_authelia  | time="2023-06-22T20:15:36Z" level=info msg="Log severity set to info"
elabs-secure-proxy_authelia  | time="2023-06-22T20:15:36Z" level=info msg="Storage schema is being checked for updates"
elabs-secure-proxy_authelia  | time="2023-06-22T20:15:36Z" level=info msg="Storage schema is already up to date"
elabs-secure-proxy_authelia  | time="2023-06-22T20:15:37Z" level=info msg="Initializing server for non-TLS connections on '[::]:9091' path '/'"
You can then access the Authelia dashboard through https://auth.example.com/ URL. You should be able to login with the authelia account and the authelia password, then Duo mobile push. If you can't, please check the logs and the configuration file.
Enabling Authelia for a given app
At first, enabling Authelia can feel counter-intuitive (you need to include Authelia location files in the server blocks, then include the authrequest files in the location blocks). Please follow the following steps to enable Authelia for our stack. The underlying logic will remain the same for future needs :
| App | Subfolder | Subdomain |
|---|---|---|
| Homepage | ROOT / subdomain |
In ./data/swag/config/nginx/site-confs/default.conf uncomment the include line related to Authelia in the server block, then in ./data/swag/config/nginx/proxy-confs/homepage.subfolder.conf uncomment the include line in the location block to activate the captive portal |
| Portainer | ROOT /portainer subfolder |
In ./data/swag/config/nginx/proxy-confs/portainer.subfolder.conf uncomment the include line in the location block to activate the captive portal |
| SWAG Dashboard | dash.example.com subdomain |
In ./data/swag/config/nginx/proxy-confs/dashboard.subdomain.conf uncomment the include line for Authelia in the location block to activate the captive portal |
Authelia ACLs
Authelia ACLs are defined in the ./data/authelia/config/configuration.yml file. ACL are pre-filled for this stack basic apps. Please follow the Authelia ACLs documentation to learn more.