$ npm install react-native-scandit@https://github.com/salathegroup/react-native-scandit.git --save
$ react-native link react-native-scandit
Notes:
- Scandit's SDK is required. See below how add it to iOS and Android projects)
- You might need to allow access to the camera, both for iOS and Android
- In Xcode, in the project navigator, right click
Libraries➜Add Files to [your project's name] - Go to
node_modules➜react-native-scanditand addSGScandit.xcodeproj - In Xcode, in the project navigator, select your project. Add
libSGScandit.ato your project'sBuild Phases➜Link Binary With Libraries - Run your project (
Cmd+R)<
- Open up
android/app/src/main/java/[...]/MainActivity.java
- Add
import com.reactlibrary.SGScanditPackage;to the imports at the top of the file - Add
new SGScanditPackage()to the list returned by thegetPackages()method
- Append the following lines to
android/settings.gradle:include ':react-native-scandit' project(':react-native-scandit').projectDir = new File(rootProject.projectDir, '../node_modules/react-native-scandit/android') - Insert the following lines inside the dependencies block in
android/app/build.gradle:compile project(':react-native-scandit')
- Download Scandit SDK for iOS (https://ssl.scandit.com/sdk, Scandit account required) and uncompress the archive.
- Copy the
ScanditSDKfolder to yourios/folder. Note: This project assumes your ios project is underios/— if not, you need to change the relative Framework Header Search path in the SGScandit.xcodeproj manually. - Continue with the Scandit install documentation (which is at the time as follows):
- Drag the
ScanditBarcodeScanner.frameworkfrom yourios/ScanditSDKfolder (Finder) inside xcode, into your projectsFrameworks/group. (If you don't have a Frameworks Group, create one via right click -> Create Group. Name it "Frameworks"). - A Model Pops-Up asking how xcode should add this file. Check both "Copy Items when needed" & "Create Groups". Select your target (should be selected) & hit ok.
- Drag the
ScanditBarcodeScanner.bundlefrom inside the frameworks package (ios/ScanditSDK/ScanditBarcodeScanner.framework/Resources/ScanditBarcodeScanner.bundle) into the Frameworks group as well. - The result should look something like this:
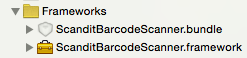
- Scandit requires additional native libraries. At a minimum
libiconv.tbd,libz.tbdandMediaPlayer.framework(if it does not compile, check the scandit documentation for the others libraries/frameworks and add the ones you are missing). Add them by selecting your Project-Root in Xcode -> Select your Target and add them underLinked Frameworks and Librariesvia the "+". - Scandit requires camera access. Make sure to add the "Privacy - Camera access" to your info.plist file in xcode (click "+" at the top and search for "Privacy - Camera..." via the auto complete. As a value, write a short description for what the camera will be used. For example "Camera is needed to scan barcode".
- Don't forget: You can not use the Camera in the simulator. So you need to use a real device for testing (!).
- Download Scandit SDK for Android (https://ssl.scandit.com/sdk, Scandit account required) and uncompress the archive. The rest is in line with scandit android setup documentation by doing the following...
- Create a folder named
vendorinside ofandroid/app/src/. - Place the ScanditSDK folder (the one containing the .aar file in its root) from the archive into
android/app/src/vendor/so that the path to the ScanditSDK isyour-rn-project/android/app/src/vendor/ScanditSDK/ScanditBarcodeScanner.aar. - Add to the
android/build.gradlefile the flatdir path$rootDir/app/src/vendor/ScanditSDK. Do that inside of theallprojects { repositories {section, so the final result looks something like this:
(..)
allprojects {
    repositories {
        mavenLocal()
        jcenter()
        // SCANDIT INSERT ----->
        flatDir {
            dirs "$rootDir/app/src/vendor/ScanditSDK"
        }
        // <----- SCANDIT INSERT END
        maven {
            // All of React Native (JS, Obj-C sources, Android binaries) is installed from npm
            url "$rootDir/../node_modules/react-native/android"
        }
    }
}- Go into your
android/app/build.gradleund add to the dependencies section (located at the end of the gradle file) the linecompile(name:'ScanditBarcodeScanner', ext:'aar')BEFORE the "compile project(':react-native-scandit')", so that your dependencies look something like this:
(..)
dependencies {
    // (..)
    compile(name:'ScanditBarcodeScanner', ext:'aar') // <--- INSERT BEFORE react-native-scandit compile statement
    compile project(':react-native-scandit')
    // (..)
    compile fileTree(dir: "libs", include: ["*.jar"])
    compile "com.android.support:appcompat-v7:23.0.1"
    compile "com.facebook.react:react-native:+"  // From node_modules
}
(..)- Scandit requires camera access. Make sure to add to your
AndroidManifest.xml(underandroid/app/src/main/) the folliwng permission:
<uses-permission android:name="android.permission.CAMERA"/>import React, { Component } from 'react';
import { AppRegistry, StyleSheet, View, Text } from 'react-native';
import Scandit, { ScanditPicker, ScanditSDKVersion } from 'react-native-scandit';
Scandit.setAppKey('<YOUR SCANDIT APP KEY>');
export default class MyFirstScanditApp extends Component {
render() {
return (
<View style={{ flex: 1 }}>
<ScanditPicker
ref={(scan) => { this.scanner = scan; }}
style={{ flex: 1 }}
settings={{
enabledSymbologies: ['EAN13', 'EAN8', 'UPCE'],
cameraFacingPreference: 'back'
}}
onCodeScan={(code) => {alert(code.data);}}
/>
<Text>Using Scandit SDK {ScanditSDKVersion}</Text>
</View>
);
}
}
AppRegistry.registerComponent('NAME_OF_RN_PROJECT', () => MyFirstScanditApp);type ScanditSettingsType = {
activeScanningAreaLandscape?: ScanditScanAreaType;
activeScanningAreaPortrait?: ScanditScanAreaType;
cameraFacingPreference?: 'front' | 'back';
codeCachingDuration?: number;
codeDuplicateFilter?: number;
codeRejectionEnabled?: boolean;
enabledSymbologies?: ScanditSymbologyType[];
force2dRecognition?: boolean;
highDensityModeEnabled?: boolean;
matrixScanEnabled?: boolean;
maxNumberOfCodesPerFrame?: number;
motionCompensationEnabled?: boolean;
relativeZoom?: number;
restrictedAreaScanningEnabled?: boolean;
scanningHotSpot?: ScanditPointType;
workingRange?: 'standard' | 'long';
}
settings: Scandit picker settings (see above)
onScan: on scan, called with the full object passed by Scandit's SDK
onCodeScan: on scan, called with the last scanned barcode only
onSettingsChange: obvious. Can be used to update the interface (i.e. a button that shows “Use front camera” / “Use back camera”)
getSettings(): Promise<*>
setSettings(settings: SettingsType): Promise<*>
startScanning(): Promise<*>
These return a promise, that can resolve or reject. On Android, I had to resolve to a promise implementation on the JS side (see SGNativeComponent.js), since React Native doesn’t seem to handle it (did I miss something?).
startScanningInPausedState()
stopScanning()
pauseScanning()
resumeScanning()
These don’t return a promise but could. As everything was quite experimental, I didn’t reach that point.
activity(): string
Ideally, this should return the current state ('active', 'paused', or 'stopped'), but it doesn't (TODO kind of thing...).