This project is dedicated to the development of silicone inserts in culture plastic. These will block cells from growing in a particular area, after which they are removed and it becomes possible to study the migration of cells to an empty site. I tried just flat silicone pieces, but they didn't hold well, especially in liquid. So now these things are arranged like suction cups. For 24 well plates, I made inserts with a diameter of 6 and 7 mm. There are some other options, but I'll post them later.

To make such inserts, you need to print a mold on an MSLA 3D printer, and then pour two-component silicone into it. After hardening, the inserts are ready for use.
I printed molds on a MSLA 3D printer (Anycubic Photon S) from a standard (Translucent Green) resin. For all printers and resins, different print settings are used, so there is not much point in applying mine here. Molds are printed strictly horizontally, flat, without any support. Printing at an angle greatly complicates the geometry of the parts due to the approximation of a complex shape by voxels, and the resulting inserts will not stick to the plastic reliably. Molds are designed in such a way that they are separated from the table without any problems. There are different approaches to cleaning up objects after MSLA printing. I first wash them in dirty alcohol (IPA, although ET-OH also works fine), poured into a small container from IKEA, then for 15 minutes I wash it in an Anycubic Wash'n'Cure station in a slightly cleaner one. Finally, I flush them with a jet of alcohol from a squirt bottle and blow compressed air from a can (the one for cleaning computers) to remove all the alcohol.
Finally, I cure the objects in the same station (15 min), positioning them at such an angle that the ultraviolet accurately penetrates the cells. It is cells who must be reliably illuminated so that silicone does not stick to them later.
This is the tricky part. Staying in the ideology of accessibility and DIY, I used the usual model two-component silicone available in the hobby store. Two-component platinum-based silicones definitely do not work - there is some kind of reaction between the silicone and the printed part and the silicone does not polymerize. Tin-based silicones remain, they generally work well. However, not all, I have met at least one that sticks to MSLA printed parts absolutely tightly and then it is impossible to separate the finished inserts. Accordingly, if someone decides to make such inserts, silicone will have to be selected empirically. I didn't use any chemical separators because I didn't want to add their remnants to the biological medium.
Two-component silicone is mixed according to the manufacturer's instructions and poured into the wells. If the silicone is viscous, then the molds may have to be evacuated. I used a fairly fluid one, so there were no problems with bubbles. However, if bubbles form in the finished inserts, they will spoil everything, in which case the molds with silicone must be evacuated. A certain amount of silicone may leave the wells - the most important thing is that their bottom is evenly covered, silicone can always be added after vacuuming.
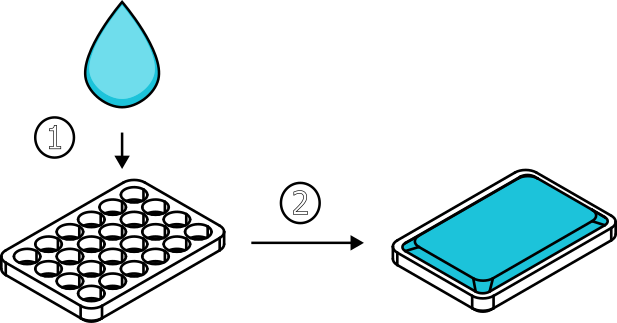
But the next part requires some skill. With a wooden spatula (or any flat tool that you don’t mind throwing away later), you need to remove excess silicone, which will definitely be. The easiest way is to place the tool at an angle to the mold and, as it were, cut off all excess silicone. Ideally, the wells should be filled exactly to the edge, but no more. You can try to remove the excess with a cloth, but this is not very convenient.
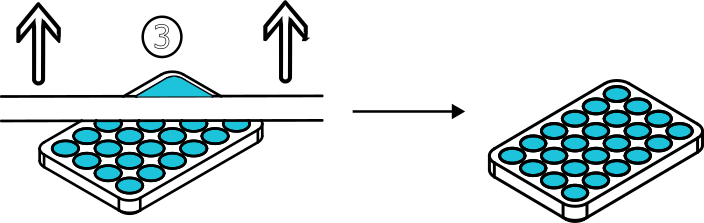
After the silicone has hardened, the inserts can be removed with tweezers. Normally, they are removed quite easily, but if they stick so that they are torn to pieces, this silicone is probably not suitable.
After being removed from the molds, the inserts can be sterilized with ethyl alcohol. I have not tried other methods of sterilization, although they certainly exist. Ethanol sterilization requires inserts to be placed in 70% ethanol for several minutes, after which they are removed, dried and placed in phosphate buffer or any other sterile liquid to remove residual ethanol. Finally the inserts are ready to use. In order to install the insert into the cell of the plate, it is worth using tweezers. The most important thing is to determine where the insert has the top, it is more shiny, and the bottom is matte. Accordingly, the lower part of the insert is placed on the bottom of the well and gently pressed with tweezers from above. This is also a skill, however by the middle of the first 24 well plate it starts to come easy. It is worth adding cells to the plate with relative accuracy. If you fill them too hard, you can wash off the insert, although this is unlikely.

WARNING: These silicone inserts are amazingly bouncy. If they are pressed too hard and then released abruptly, they can jump to the other end of the laminar flow hood and fall into the vents.
To make sure the inserts stick, you can turn the plate upside down. If the inserts are held securely they will of course not fall off if everything is done correctly.

The next day, you can remove the inserts from the cells with tweezers and see something like this. I have not observed any significant cellular toxicity from silicone, but I may have been lucky with the choice of silicone. These are Vero culture cells, but experiments were also carried out with others cell lines.

https://doi.org/10.3390/ijms24098150
This project is open-source and is released under the CERN open hardware license. All files have been designed using FreeCAD, illustrations made in FreeCAD and Inkscape.