For the cluster mode readme click here.
- Virtual machine
- Docker
- Docker-Compose
- (sudo) rights
- Certificates
- Clone the project
git clone https://github.com/Nenodema/docker-hashicorp-vault.git
- Enter the project directory and start the container with docker-compose
cd docker-hashicorp-vault/standalone
(sudo) docker-compose up -d
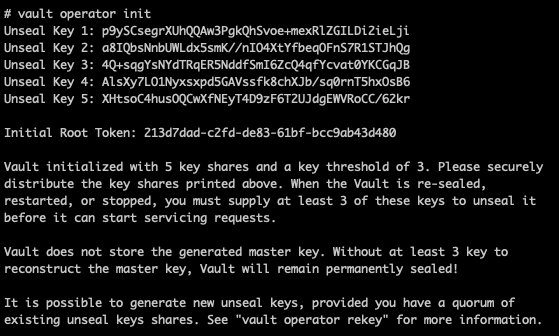
- Enter container and initilize vault (save the unseal keys on a secure location)
(sudo) docker exec -it vault_vault-server_1 /bin/sh
vault operator init
-
Go to http://VAULT_IP:8200/ and unseal the vault with 3 of the 5 keys
-
Login with the "Initial Root Token" which is provided after the vault initionalization
-
Have fun and stay safe
standalone
├── config
│   └── vault.json
└── docker-compose.yml
- https://www.bogotobogo.com/DevOps/Docker/Docker-Vault-Consul.php
- https://developer.hashicorp.com/vault/docs/concepts/seal
- Virtual machine (minimum of three)
- Docker
- Docker-Compose
- (sudo) rights
- Certificates
- Clone the project
git clone https://github.com/Nenodema/docker-hashicorp-vault.git
- Change variables in the following files:
- .env
- config/vault.json
- certs/generate_CA.sh
- certs/generate_certificate.sh
- certs/generate_certificate_request.sh
- Generate CA, copy and rename CA file, move vault-server-ca.crt to the config directory
cd certs
chmod 766 * (make sure that you are in the certs directory!)
./certs/generate_CA.sh
cp vault-server-ca.pem ../vault-server-ca.crt
- Generarte Certificate request per machine
./certs/generate_certificate_request.sh
- Generarte Certificate per machine
./certs/generate_certificate.sh
- Copy the "cert.pem" and the "key.pm" to the config directory
cp cert.pem key.pem ../config
- Enter the project directory and start the container with docker-compose
verify that you are in the following directory: docker-hashicorp-vault/cluster
(sudo) docker-compose up -d --build
- Enter container and initilize vault (save the unseal keys on a secure location)
(sudo) docker exec -it vault_vault-server_1 /bin/sh
vault operator init
-
Go to http://VAULT_IP:8200/ and unseal the vault with 3 of the 5 keys
-
Login with the "Initial Root Token" which is provided after the vault initionalization
-
Execute steps 1-10 for the other two nodes
-
Join the new two nodes to the first node
(sudo) docker exec -it vault_vault-server_1 /bin/sh
vault operator raft join "https://$PRIMARY_NODE:8200"
vault operator unseal (3 times)
- check the status of the cluster
vault login (use the "Initial Root Token" which is provided after the vault initionalization
vault operator raft list-peers
Node Address State Voter
 — — — — — — — — — — — — — — — — — — — — — — — — -
vault_node_1 10.99.99.10:8201 leader true
vault_node_2 10.99.99.11:8201 follower true
vault_node_3 10.99.99.12:8201 follower true
-
Go to http://VAULT_IP:8200/ of one of the nodes
-
Login with the "Initial Root Token" which is provided after the vault initionalization
-
Have fun and stay safe
cluster
├── Dockerfile
├── certs
│   ├── generate_CA.sh
│   ├── generate_certificate.sh
│   └── generate_certificate_request.sh
├── config
│   └── vault.json
└── docker-compose.yml