
Refactor the monolith application to microservices + create fully automated CI/CD pipeline using Travis CI, Docker, Kubernetes (AWS EKS), reverse proxy (NginX), Logging and tracing system
The project is split into two parts:
- Frontend - Angular web application built with Ionic Framework
- Backend RESTful API - Node-Express application
- Kubernetes (K8s) AWS Elastic Kubernetes Service (EKS) - Container Orchestration
- Docker - Containerization
- Nginx - Reverse Proxy
- AWS S3 - Image Storage
- AWS RDS - Database
- Full logging & monitoring system (For both backend and frontend)
- Fully Automated CI Pipeline - Travis CI (Docker Image Builder and Pusher)
- Fully Automated CD Pipeline - AWS Kubernetes Deployment (EKS)
- Microservices Based Architecture
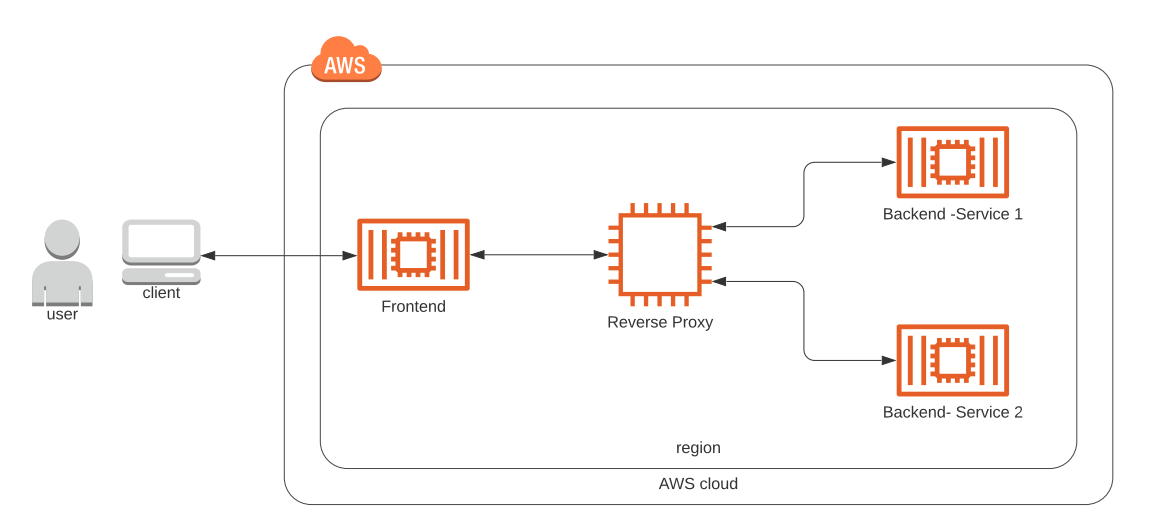

tip: it's recommended that you start with getting the backend API running since the frontend web application depends on the API.
- The depends on the Node Package Manager (NPM). You will need to download and install Node from https://nodejs.com/en/download. This will allow you to be able to run
npmcommands. - Environment variables will need to be set. These environment variables include database connection details that should not be hard-coded into the application code.
A file named set_env.sh has been prepared as an optional tool to help you configure these variables on your local development environment.
We do not want your credentials to be stored in git. After pulling this starter project, run the following command to tell git to stop tracking the script in git but keep it stored locally. This way, you can use the script for your convenience and reduce risk of exposing your credentials.
git rm --cached set_env.sh
Afterwards, we can prevent the file from being included in your solution by adding the file to our .gitignore file.
Create a PostgreSQL database either locally or on AWS RDS. The database is used to store the application's metadata.
- We will need to use password authentication for this project. This means that a username and password is needed to authenticate and access the database.
- The port number will need to be set as
5432. This is the typical port that is used by PostgreSQL so it is usually set to this port by default.
Once your database is set up, set the config values for environment variables prefixed with POSTGRES_ in set_env.sh.
- If you set up a local database, your
POSTGRES_HOSTis most likelylocalhost - If you set up an RDS database, your
POSTGRES_HOSTis most likely in the following format:***.****.us-west-1.rds.amazonaws.com. You can find this value in the AWS console's RDS dashboard.
Create an AWS S3 bucket. The S3 bucket is used to store images that are displayed in Udagram.
Set the config values for environment variables prefixed with AWS_ in set_env.sh.
Launch the backend API locally. The API is the application's interface to S3 and the database.
- To download all the package dependencies, run the command from the directory
udagram-api/:npm install . - To run the application locally, run:
npm run dev
- You can visit
http://localhost:8080/api/v0/feedin your web browser to verify that the application is running. You should see a JSON payload. Feel free to play around with Postman to test the API's.
Launch the frontend app locally.
- To download all the package dependencies, run the command from the directory
udagram-frontend/:npm install . - Install Ionic Framework's Command Line tools for us to build and run the application:
npm install -g ionic
- Prepare your application by compiling them into static files.
ionic build
- Run the application locally using files created from the
ionic buildcommand.ionic serve
- You can visit
http://localhost:8100in your web browser to verify that the application is running. You should see a web interface.
The project application, Udagram - an Image Filtering application, allows users to register and log into a web client, and post photos to a feed.
This section introduces the project followed by instructions on how to set up your local environment remote dependencies to be able to configure and run the starter project.
At a high level, the project has 2 main components:
- Frontend Web App - Angular web application built with Ionic Framework
- Backend RESTful API - Node-Express application
In this project you will:
- Refactor the monolith application to microservices
- Set up each microservice to be run in its own Docker container
- Set up a Travis CI pipeline to push images to DockerHub
- Deploy the DockerHub images to the Kubernetes cluster
You should have the following tools installed in your local machine:
- Git
- Node.js
- PostgreSQL client
- Ionic CLI
- Docker
- AWS CLI
- kubectl
We will provide some details and tips on how to set up the mentioned prerequisites. In general, we will opt to defer you to official installation instructions as these can change over time.
Git is used to interface with GitHub.
Windows users: Once you download and install Git for Windows, you can execute all the bash, ssh, git commands in the Gitbash terminal. On the other hand, Windows users using Windows Subsystem for Linux (WSL) can follow all steps as if they are Linux users.
Install Git for your corresponding operating system.
Install Node.js using these instructions. We recommend a version between 12.14 and 14.15.
This installer will install Node.js as well as NPM on your system. Node.js is used to run JavaScript-based applications and NPM is a package manager used to handle dependencies.
# v12.14 or greater up to v14.15
node -v
# v7.19 or greater
npm -vUsing PostgreSQL involves a server and a client. The server hosts the database while the client interfaces with it to execute queries. Because we will be creating our server on AWS, we will only need to install a client for our local setup.
The easiest way to set this up is with the PostgreSQL Installer. This installer installs a PostgreSQL client in the form of the psql command line utility.
Ionic Framework is used to make cross-platform applications using JavaScript. It is used to help build and run Udagram.
Use these instructions to install Ionic Framework with npm.
# v6.0 or higher
ionic --version
Docker is needed to build and run containerized applications.
Follow the instructions for Docker Desktop to install Docker.
We use AWS CLI to interface programmatically with AWS.
Follow these instructions to set up AWS CLI.
After it's installed, you will need to configure an AWS access profile locally so that our local environment knows how to access your AWS account:
- Create an IAM user with admin privileges on the AWS web console. Copy its Access Key.
- Configure the access profile locally using your Access Key:
aws configure [--profile nd9990]# aws-cli/2.0.0 or greater
aws --versionkubectl is the command line tool to interface with Kubernetes. We will be using this to communicate with the EKS cluster that we create in AWS.
Follow the instructions here.
To run this project, you are expected to have:
- An S3 bucket
- A PostgreSQL database
The project uses an AWS S3 bucket to store image files.
-
Navigate to S3 from the AWS console.
-
Create a public S3 bucket with default configurations (eg. no versioning, disable encryption).
-
In your newly-created S3 bucket, go to the Permissions tab and add an additional bucket policy to enable access for other AWS services (ie. Kubernetes).
You can use the policy generator tool to generate such an IAM policy. See an example below (change the bucket name in your case).
{
  "Version": "2012-10-17",
  "Statement": [
    {
      "Sid": "Stmt1625306057759",
      "Principal": "*",
      "Action": "s3:*",
      "Effect": "Allow",
      "Resource": "arn:aws:s3:::test-nd9990-dev-wc"
    }
  ]
}
In the AWS S3 console, the CORS configuration must be JSON format. Whereas, the AWS CLI can use either JSON or XML format.
Once the policies above are set and you are no longer testing locally, you can disable public access to your bucket.
We will create a PostgreSQL database using AWS RDS. This is used by the project to store user metadata.
-
Navigate to RDS from the AWS console.
-
Create a PostgreSQL database with the following configurations:
Field Value Database Creation Method Standard create Engine Option PostgreSQL 12 or greater Templates Free tier (if no Free tier is available, select a different PostgreSQL version) DB Instance Identifier Your choice Master Username Your choice Password Your choice DB Instance Class Burstable classes with minimal size VPC and Subnet Default Public Access Yes Database Authentication Password authentication VPC security group Either choose default or
create a new oneAvailability Zone No preferencce Database port 5432(default) -
Once the database is created successfully (this will take a few minutes), copy and save the database endpoint, master username, and password to your local machine. These values are required for the application to connect to the database.
-
Edit the security group's inbound rule to allow incoming connections from anywhere (
0.0.0.0/0). This will allow an application that is running locally to connect to the database.
Note: AWS RDS will automatically create a database with the name
postgresif none is configured during the creation step. By following the setup instructions provided here, we will be using the default database name.
Test the connection from your local PostgreSQL client.
Assuming the endpoint is: mypostgres-database-1.c5szli4s4qq9.us-east-1.rds.amazonaws.com, you can run:
psql -h mypostgres-database-1.c5szli4s4qq9.us-east-1.rds.amazonaws.com -U [your-username] postgres
# Provide the database password when prompted
If your connection is succesful, your terminal should print "postgres=>".
You can play around with some psql commands found here.
Afterwards, you can enter \q to quit.
Once the local and remote prerequisites are set up, we will need to configure our application so that they can connect and utilize them.
If you have not already done so, you will need to fork and clone the project so that you have your own copy to work with.
git clone https://github.com/<YOUR_GITHUB_USERNAME>/nd9990-c3-microservices-exercises.git

cd nd9990-c3-microservices-exercises/project/The application will need to connect to the AWS PostgreSQL database and S3 bucket that you have created.
We do not want to hard-code the configuration details into the application code. The code should not contain sensitive information (ie. username and password).
For this reason, we will follow a common pattern to store our credentials inside environment variables. We'll explain how to set these values in Mac/Linux environments and Windows environments followed by an example.
-
Use the
set_env.shfile present in theproject/directory to configure these values on your local machine. This is a file that has been set up for your convenience to manage your environment. -
Prevent this file from being tracked in
gitso that your credentials don't become stored remotely:# Stop git from tracking the set_env.sh file git rm --cached set_env.sh # Prevent git from tracking the set_env.sh file echo *set_env.sh >> .gitignore
-
Running the command
source set_env.shwill set your environment variables.Note: The method above will set the environment variables temporarily. Every time you open a new terminal, you will have to run
source set_env.shto reconfigure your environment variables
- Set the configuration values as environment variables:
source set_env.sh- Verify that environment variables were set by testing one of the expected values:
echo $POSTGRES_USERNAMESet all the environment variables as shown in the set_env.sh file either using the Advanced System Settings or d GitBash/WSL terminal.
Below is an example. Make sure that you replace the values with ones that are applicable to the resources that you created in AWS.
setx POSTGRES_USERNAME postgres
setx POSTGRES_PASSWORD abcd1234
setx POSTGRES_HOST mypostgres-database-1.c5szli4s4qq9.us-east-1.rds.amazonaws.com
setx POSTGRES_DB postgres
setx AWS_BUCKET test-nd9990-dev-wc
setx AWS_REGION us-east-1
setx AWS_PROFILE nd9990
setx JWT_SECRET hello
setx URL http://localhost:8100Now that we have our prerequsites set up and configured, we will be following up this section with an overview of how to run the application.
To understand how you project will be assessed, see the Project Rubric
Now that you have set up the AWS PostgreSQL database and S3 bucket, and saved the environment variables, let's run the application locally. It's recommended that you start the backend application first before starting the frontend application that depends on the backend API.
Download all the package dependencies by running the following command from the /project/udagram-api/ directory:
npm install .Run the application locally in a development environment. This has been configured so that the changes in your code take effect without needing to restart the server.
npm run devOnce this command is run successfully, visit the http://localhost:8080/api/v0/feed in your web browser to verify that the application is running. You should see a JSON payload.
Download all the package dependencies by running the following command from the /project/udagram-frontend/ directory:
npm install .ionic build
ionic serveNote: If you don't have Ionic CLI installed already, revisit the prerequisites in the previous section for setup instructions.
Visit http://localhost:8100 in your web browser to verify that the application is running. You should see a web interface.
At this point, you should have a fully working web application that interfaces with an API. Feel free to play around with the application and its code to get an idea of how it works.
The rest of this section will provide some optional steps for your code.
It's useful to lint your code so that changes in the codebase adhere to a coding standard. This helps alleviate issues when developers use different styles of coding.
eslint has been set up for TypeScript in the codebase for you. To lint your code, run the following:
npx eslint --ext .js,.ts src/To have your code fixed automatically, run
npx eslint --ext .js,.ts src/ --fixThe objective of this part of the project is to:
- Refactor the monolith application to microservices
- Set up each microservice to be run in its own Docker container
Once you refactor the Udagram application, it will have the following services running internally:
- Backend
/user/service - allows users to register and log into a web client. - Backend
/feed/service - allows users to post photos, and process photos using image filtering. - Frontend - It is a basic Ionic client web application that acts as an interface between the user and the backend services.
- Nginx as a reverse proxy server - for resolving multiple services running on the same port in separate containers. When different backend services are running on the same port, then a reverse proxy server directs client requests to the appropriate backend server and retrieves resources on behalf of the client.
Keep in mind that we don’t want to make any feature changes to the frontend or backend code. If a user visits the frontend web application, it should look the same regardless of whether the application is structured as a monolith or microservice.
Navigate to the project directory, and set up the environment variables again:
source set_env.shThe current /project/udagram-api/ backend application code contains logic for both /users/ and /feed/ endpoints. Let's decompose the API code into the following two separate services that can be run independently of one another.
- /project/udagram-api-feed/
- /project/udagram-api-user/
Create two new directories (as services) with the names above. Copy the backend starter code into the above individual services, and then break apart the monolith. Each of the services above will have the following directory structure, with a lot of duplicate code.
.
├── mock           # Common and no change
├── node_modules   # Auto generated. Do not copy. Add this into the .gitignore and .dockerignore
├── package-lock.json # Auto generated. Do not copy.
├── package.json      # Common and no change
├── src
│   ├── config        # Common and no change
│   ├── controllers/v0  # TODO: Keep either /feed or /users service.   Delete the other folder
│         ├── index.router.ts  # TODO: Remove code related to other (either feed or users) service
│         └── index.router.ts  # TODO: Remove code related to other (either feed or users) service
│   ├── migrations   # TODO: Remove the JSON related to other (either feed or users)
│   └── server.ts    # TODO: Remove code related to other (either feed or users) service
├── Dockerfile       # TODO: Create NEW, and common
└── .dockerignore    # TODO: Add "node_modules" to this file
The Dockerfile for the above two backend services will be like:
FROM node:13
# Create app directory
WORKDIR /usr/src/app
# Install app dependencies

COPY package*.json ./
RUN npm ci
# Bundle app source
COPY . .
EXPOSE 8080
CMD [ "npm", "run", "prod" ]
Note: A wildcard is used in the line
COPY package*.json ./to ensure both package.json and package-lock.json are copied where available (npm@5+)
It's not a hard requirement to use the exact same Dockerfile above. Feel free to use other base images or optimize the commands.
In the frontend service, you just need to add a Dockerfile to the /project/udagram-frontend/ directory.
## Build
FROM beevelop/ionic:latest AS ionic
# Create app directory
WORKDIR /usr/src/app
# Install app dependencies
# A wildcard is used to ensure both package.json AND package-lock.json are copied
COPY package*.json ./
RUN npm ci
# Bundle app source
COPY . .
RUN ionic build
## Run
FROM nginx:alpine
#COPY www /usr/share/nginx/html
COPY --from=ionic /usr/src/app/www /usr/share/nginx/htmlTip: Add
.dockerignoreto each of the services above, and mentionnode_modulesin that file. It will ensure that thenode_moduleswill not be included in the DockerfileCOPYcommands.
Use another container named reverseproxy running the Nginx server. The reverseproxy service will help add another layer between the frontend and backend APIs so that the frontend only uses a single endpoint and doesn't realize it's deployed separately. *This is one of the approaches and not necessarily the only way to deploy the services. *To set up the reverseproxy container, follow the steps below:
- Create a newer directory _/project/udagram-reverseproxy/ _
- Create a Dockerfile as:
FROM nginx:alpine
COPY nginx.conf /etc/nginx/nginx.conf- Create the nginx.conf file that will associate all the service endpoints as:
worker_processes 1;
events { worker_connections 1024; }
error_log /dev/stdout debug;
http {
    sendfile on;
    upstream user {
        server backend-user:8080;
    }
    upstream feed {
        server backend-feed:8080;
    }
    proxy_set_header   Host $host;
    proxy_set_header   X-Real-IP $remote_addr;
    proxy_set_header   X-NginX-Proxy true;
    proxy_set_header   X-Forwarded-For $proxy_add_x_forwarded_for;
    proxy_set_header   X-Forwarded-Host $server_name;
    server {
        listen 8080;
        location /api/v0/feed {
            proxy_pass         http://feed;
        }
        location /api/v0/users {
            proxy_pass         http://user;
        }
    }
}
The Nginx container will expose 8080 port. The configuration file above, in the server section, it will route the http://localhost:8080/api/v0/feed requests to the backend-user:8080 container. The same applies for the http://localhost:8080/api/v0/users requests.
At this moment, your project directory would have the following structure:
.
├── udagram-api-feed
│   └── src
├── udagram-api-user
│   └── src
├── udagram-frontend
│   └── src
└── udagram-reverseproxyNote: The ultimate objective of this step is to have the Docker images for each microservice ready locally. This step can also be done manually by building and running containers one by one.
-
Once you have created the Dockerfile in each of the following services directories, you can use the
docker-composecommand to build and run multiple Docker containers at once.- /project/udagram-api-feed/
- /project/udagram-api-feed/
- /project/udagram-frontend/
- /project/udagram-reverseproxy/
The docker-compose command uses a YAML file to configure your application’s services in one go. Meaning, you create and start all the services from your configuration file, with a single command. Otherwise, you will have to individually build containers one-by-one for each of your services.
- Create Images - In the project's parent directory, create a docker-compose-build.yaml file. It will create an image for each individual service. Then, you can run the following command to create images locally:
# Make sure the Docker services are running in your local machine
# Remove unused and dangling images
docker image prune --all
# Run this command from the directory where you have the "docker-compose-build.yaml" file present
docker-compose -f docker-compose-build.yaml build --parallelNote: YAML files are extremely indentation sensitive, that's why we have attached the files for you.
- Run containers using the images created in the step above. Create another YAML file, docker-compose.yaml, in the project's parent directory. It will use the existing images and create containers. While creating containers, it defines the port mapping, and the container dependency.
Once you have the YAML file above ready in your project directory, you can start the application using:
docker-compose up- Visit http://localhost:8100 in your web browser to verify that the application is running.
Prior to setting up a multi-container application in Kubernetes, you will need to set up a CI pipeline to build and push our application code as Docker images in DockerHub.
The end result that we want is a setup where changes in your GitHub code will automatically trigger a build process that generates Docker images.
Log in to https://hub.docker.com/ and create four public repositories - each repository corresponding to your local Docker images.
reverseproxyudagram-api-userudagram-api-feedudagram-frontend
Note: The names of the repositoriesare exactly the same as the
image namespecified in the docker-compose-build.yaml file
Use Travis CI pipeline to build and push images to your DockerHub registry.
-
Create an account on https://travis-ci.com/ (not https://travis-ci.org/). It is recommended that you sign in using your Github account.
-
Integrate Github with Travis: Activate your GitHub repository with whom you want to set up the CI pipeline.
-
Set up your Dockerhub username and password in the Travis repository's settings, so that they can be used inside of
.travis.ymlfile while pushing images to the Dockerhub. -
Add a
.travis.ymlconfiguration file to the project directory locally.In addition to the mandatory sections, your Travis file should automatically read the Dockerfiles, build images, and push images to DockerHub. For build and push, you can use either `docker-compose` or individual `docker build` commands as shown below. ```bash # Assuming the .travis.yml file is in the project directory, and there is a separate sub-directory for each service # Use either `docker-compose` or individual `docker build` commands # Build - docker build -t udagram-api-feed ./udagram-api-feed # Do similar for other three images ``` ```bash # Tagging - docker tag udagram-api-feed sudkul/udagram-api-feed:v1 # Do similar for other three images``` ```bash # Push # Assuming DOCKER_PASSWORD and DOCKER_USERNAME are set in the Travis repository settings - echo "$DOCKER_PASSWORD" | docker login -u "$DOCKER_USERNAME" --password-stdin - docker push sudkul/udagram-api-feed:v1 # Do similar for other three images ```Tip: Use different tags each time you push images to the Dockerhub.
-
Trigger your build by pushing your changes to the Github repository. All of these steps mentioned in the
.travis.ymlfile will be executed on the Travis worker node. It may take upto 15-20 minutes to build and push all four images. -
Verify if the newly pushed images are now available in your Dockerhub account.
So that we can verify your project’s pipeline is set up properly, please include the screenshots of the following:
- DockerHub showing images that you have pushed
- Travis CI showing a successful build job
If you are not able to get through the Travis pipeline, and still want to push your local images to the Dockerhub (only for testing purposes), you can attempt the manual method.
Note that this is only for the troubleshooting purposes, such as verifying the deployment to the Kubernetes cluster.
- Log in to the Docker from your CLI, and tag the images with the name of your registry name (Dockerhub account username).
# See the list of current images
docker images
# Use the following syntax
# In the remote registry (Dockerhub), we can have multiple versions of an image using "tags".
# docker tag <local-image-name:current-tag> <registry-name>/<repository-name>:<new-tag>
docker tag <local-image:tag> <dockerhub-username>/<repository>:<tag>
- Push the images to the Dockerhub.
docker login --username=<your-username>
# Use the "docker push" command for each image, or
# Use "docker-compose -f docker-compose-build.yaml push" if the names in the compose file are as same as the Dockerhub repositories.
We will need to set up our CLI to interface with Kubernetes, our Kubernetes cluster in EKS, and connecting our CLI tool with the newly-created cluster.
For this section we will need to use kubectl. Verify that you have the kubectl utility installed locally by running the following command:
kubectl version --shortThis should print a response with a Client Version if it's successful.
We will be creating an EKS cluster with the AWS console.
Follow the instructions provided by AWS on Creating an Amazon EKS Cluster.
Make sure that you are following the steps for AWS Management Console and not eksctl or AWS CLI (you are welcome to try creating a cluster with these alternate methods, but this course will be supporting the AWS Management Console workflow).
During the creation process, the EKS console will provide dropdown menus for selecting options such as IAM roles and VPCs. If none exist for you, follow the documentation that are linked in the EKS console.
- For the Cluster Service Role in the creation process, create an AWS role for EKS. Make sure you attach the policies for
AmazonEKSClusterPolicy,AmazonEC2ContainerServiceFullAccess, andAmazonEKSServicePolicy. - If you don't have a VPC, create one with the
IPv4 CIDR blockvalue10.0.0.0/16. Make sure you selectNo IPv6 CIDR block. - Your Cluster endpoint access should be set to Public
- Your cluster may take ~20 minutes to be created. Once it's ready, it should be marked with an Active status.
We use the AWS console and
kubectlto create and interface with EKS. eksctl is an AWS-supported tool for creating clusters through a CLI interface. Note that we will provide limited support if you choose to useeksctlto manage your cluster.
Once your cluster is created, we will need to add Node Groups so that the cluster has EC2 instances to process the workloads.
Follow the instructions provided by AWS on Creating a Managed Node Group. Similar to before, make sure you're following the steps for AWS Management Console.
- For the Node IAM Role in the creation process, create an AWS role for EKS Node Groups. Make sure you attach the policies for
AmazonEKSWorkerNodePolicy,AmazonEC2ContainerRegistryReadOnly, andAmazonEKS_CNI_Policy. - We recommend using
m5.largeinstance types - We recommend setting 2 minimum nodes, 3 maximum nodes
Follow the instructions provided by AWS on Create a kubeconfig for Amazon EKS. This will make it such that your kubectl will be running against your newly-created EKS cluster.
Once kubectl is configured to communicate with your EKS cluster, run the following to validate that it's working:
kubectl get nodesThis should return information regarding the nodes that were created in your EKS clusteer.
In this step, you will deploy the Docker containers for the frontend web application and backend API applications in their respective pods.
Recall that while splitting the monolithic app into microservices, you used the values saved in the environment variables, as well as AWS CLI was configured locally. Similar values are required while instantiating containers from the Dockerhub images.
-
ConfigMap: Create
env-configmap.yaml, and save all your configuration values (non-confidential environments variables) in that file. -
Secret: Do not store the PostgreSQL username and passwords in the
env-configmap.yamlfile. Instead, createenv-secret.yamlfile to store the confidential values, such as login credentials. Unlike the AWS credentials, these values do not need to be Base64 encoded. -
Secret: Create aws-secret.yaml file to store your AWS login credentials. Replace
___INSERT_AWS_CREDENTIALS_FILE__BASE64____with the Base64 encoded credentials (not the regular username/password).- Mac/Linux users: If you've configured your AWS CLI locally, check the contents of
~/.aws/credentialsfile usingcat ~/.aws/credentials. It will display theaws_access_key_idandaws_secret_access_keyfor your AWS profile(s). Now, you need to select the applicable pair ofaws_access_keyfrom the output of thecatcommand above and convert that string intobase64. You use commands, such as:
- Mac/Linux users: If you've configured your AWS CLI locally, check the contents of
# Use a combination of head/tail command to identify lines you want to convert to base64
# You just need two correct lines: a right pair of aws_access_key_id and aws_secret_access_key
cat ~/.aws/credentials | tail -n 5 | head -n 2
# Convert
cat ~/.aws/credentials | tail -n 5 | head -n 2 | base64
* **Windows users:** Copy a pair of *aws_access_key* from the AWS credential file and paste it into the encoding field of this third-party website: https://www.base64encode.org/ (or any other). Encode and copy/paste the result back into the *aws-secret.yaml* file.
-
Deployment configuration: Create deployment.yaml file individually for each service. While defining container specs, make sure to specify the same images you've pushed to the Dockerhub earlier. Ultimately, the frontend web application and backend API applications should run in their respective pods.
-
**Service configuration: **Similarly, create the service.yaml file thereby defining the right services/ports mapping.
Once, all deployment and service files are ready, you can use commands like:
# Apply env variables and secrets
kubectl apply -f aws-secret.yaml
kubectl apply -f env-secret.yaml
kubectl apply -f env-configmap.yaml
# Deployments - Double check the Dockerhub image name and version in the deployment files
kubectl apply -f backend-feed-deployment.yaml
# Do the same for other three deployment files
# Service
kubectl apply -f backend-feed-service.yaml
# Do the same for other three service files
Make sure to check the image names in the deployment files above.
If the deployment is successful, and services are created, there are two options to access the application:
-
If you deployed the services as CLUSTERIP, then you will have to forward a local port to a port on the "frontend" Pod. In this case, you don't need to change the URL variable locally.
-
If you exposed the "frontend" deployment using a Load Balancer's External IP, then you'll have to update the URL environment variable locally, and re-deploy the images with updated env variables.
Below, we have explained method #2, as mentioned above.
Use this link to expose an External IP address to access your application in the EKS Cluster.
# Check the deployment names and their pod status
kubectl get deployments
# Create a Service object that exposes the frontend deployment:
kubectl expose deployment frontend --type=LoadBalancer --name=publicfrontend
kubectl get services publicfrontend
# Note down the External IP, such as
# a5e34958a2ca14b91b020d8aeba87fbb-1366498583.us-east-1.elb.amazonaws.com
# Check name, ClusterIP, and External IP of all deployments
kubectl get servicesOnce you have the External IP of your front end and reverseproxy deployment, Change the API endpoints in the following places locally:
-
Environment variables - Replace the http://localhost:8100 string with the Cluster-IP of the frontend service. After replacing run
source ~/.zshrcand verify usingecho $URL -
udagram-deployment/env-configmap.yaml file - Replace http://localhost:8100 string with the Cluster IP of the frontend.
-
udagram-frontend/src/environments/environment.ts file - Replace 'http://localhost:8080/api/v0' string with either the Cluster IP of the reverseproxy deployment.
-
udagram-frontend/src/environments/environment.prod.ts - Replace 'http://localhost:8080/api/v0' string.
-
Retag in the
.travis.yaml(say use v3, v4, v5, ...) as well as deployment YAML files
Then, push your changes to the Github repo. Travis will automatically build and re-push images to your Dockerhub. Next, re-apply configmap and re-deploy to the k8s cluster.
kubectl apply -f env-configmap.yaml
# Rolling update "frontend" containers of "frontend" deployment, updating the image
kubectl set image deployment frontend frontend=sudkul/udagram-frontend:v3
# Do the same for other three deployments
Check your deployed application at the External IP of your publicfrontend service.
Note: There can be multiple ways of setting up the deployment in the k8s cluster. As long as your deployment is successful, and fulfills Project Rubric, you are good go ahead!
- Use this command to see the STATUS of your pods:
kubectl get pods
kubectl describe pod <pod-id>
# An example:
# kubectl logs backend-user-5667798847-knvqz
# Error from server (BadRequest): container "backend-user" in pod "backend-user-5667798847-knvqz" is waiting to start: trying and failing to pull image
In case of ImagePullBackOff or ErrImagePull or CrashLoopBackOff, review your deployment.yaml file(s) if they have the right image path.
- Look at what's there inside the running container. Open a Shell to a running container as:
kubectl get pods
# Assuming "backend-feed-68d5c9fdd6-dkg8c" is a pod
kubectl exec --stdin --tty backend-feed-68d5c9fdd6-dkg8c -- /bin/bash
# See what values are set for environment variables in the container
printenv | grep POST
# Or, you can try "curl <cluster-IP-of-backend>:8080/api/v0/feed " to check if services are running.
# This is helpful to see is backend is working by opening a bash into the frontend container- When you are sure that all pods are running successfully, then use developer tools in the browser to see the precise reason for the error.
- If your frontend is loading properly, and showing Error: Uncaught (in promise): HttpErrorResponse: {"headers":{"normalizedNames":{},"lazyUpdate":null,"headers":{}},"status":0,"statusText":"Unknown Error"...., it is possibly because the udagram-frontend/src/environments/environment.ts file has incorrectly defined the ‘apiHost’ to whom forward the requests.
- If your frontend is not not loading, and showing Error: Uncaught (in promise): HttpErrorResponse: {"headers":{"normalizedNames":{},"lazyUpdate":null,"headers":{}},"status":0,"statusText":"Unknown Error", .... , it is possibly because URL variable is not set correctly.
- In the case of Failed to load resource: net::ERR_CONNECTION_REFUSED error as well, it is possibly because the URL variable is not set correctly.
So that we can verify that your project is deployed, please include the screenshots of the following commands with your completed project.
# Kubernetes pods are deployed properly
kubectl get pods
# Kubernetes services are set up properly
kubectl describe services
# You have horizontal scaling set against CPU usage
kubectl describe hpaUse logs to capture metrics. This can help us with debugging.
To verify that user activity is logged, please include a screenshot of:
kubectl logs <your pod name>Try one or more of these to take your project to the next level.
-
Reduce Duplicate Code - When we decomposed our API code into two separate applications, we likely had a lot of duplicate code. Optionally, you could reduce the duplicate code by abstracting them into a common library.
-
Secure the API - The API is only meant to be consumed by the frontend web application. Let's set up ingress rules so that only web requests from our web application can make successful API requests.
The project will be submitted as a link to a GitHub repo or a zip file and should include screenshots to document the application's infrastructure.
- Docker images in your repository in DockerHub
- TravisCI build pipeline showing successful build jobs
- Kubernetes
kubectl get podsoutput - Kubernetes
kubectl describe servicesoutput - Kubernetes
kubectl describe hpaoutput - Kubernetes
kubectl logs <your pod name>output
Once we are done with our exercises, it helps to remove our AWS resources so that we don't accrue unnecessary charges to our AWS balance.
- Delete the EKS cluster.
- Delete the S3 bucket and RDS PostgreSQL database.